An isochrone map shows how far one can travel from a certain point within a given amount of time. Below is a map depicting how far one could travel on foot within 50 minutes from Tallinn's Old Town.
Valhalla is a routing engine that works with OpenStreetMap data. Work started on it in 2014 and it's made up of 145K lines of C++. Beyond isochrones, it also supports route planning, including taking transit availability into account and route optimisation.
In this post, I'll walk through setting up Valhalla and building the above isochrone map using OpenStreetMap data and QGIS for rendering.
Valhalla, Up & Running
I'm using a fresh install of Ubuntu 20.04 LTS with an Intel Core i5 4670K clocked at 3.4 GHz, 16 GB of DDR3 RAM and 250 GB of NVMe SSD capacity.
Below I'll install some build tools and utilities used throughout this post.
$ sudo apt update
$ sudo apt install \
    autoconf \
    automake \
    build-essential \
    cmake \
    jq \
    lcov \
    libboost-all-dev \
    libcurl4-openssl-dev \
    libczmq-dev \
    libluajit-5.1-dev \
    liblz4-dev \
    libprotobuf-dev \
    libspatialite-dev \
    libsqlite3-dev \
    libsqlite3-mod-spatialite \
    libtool \
    libzmq3-dev \
    luajit \
    pkg-config \
    protobuf-compiler \
    python-all-dev \
    spatialite-bin \
    zlib1g-dev
I try and use packages when I can but Valhalla has issues with the GEOS package distributed with Debian and Ubuntu. Below I'll build and install GEOS from its source code instead.
$ cd ~
$ wget -c https://download.osgeo.org/geos/geos-3.10.3.tar.bz2
$ tar xfj geos-3.10.3.tar.bz2
$ cd geos-3.10.3
$ mkdir build
$ cd build
$ cmake \
    -DCMAKE_BUILD_TYPE=Release \
    -DCMAKE_INSTALL_PREFIX=/usr/local \
    ..
$ make -j$(nproc)
$ sudo make install
$ sudo ldconfig
Valhalla uses the prime_server project as its web application server. Below I'll build and install it.
$ git clone https://github.com/kevinkreiser/prime_server.git ~/prime_server
$ cd ~/prime_server
$ git submodule update --init --recursive
$ ./autogen.sh
$ ./configure
$ make -j$(nproc)
$ sudo make install
$ sudo ldconfig
The following will build and install Valhalla.
$ git clone https://github.com/valhalla/valhalla.git ~/valhalla
$ cd ~/valhalla
$ git submodule update --init --recursive
$ mkdir build
$ cd build
$ CXXFLAGS=-DGEOS_INLINE \
    cmake .. \
        -DCMAKE_BUILD_TYPE=Release \
        -DENABLE_BENCHMARKS=OFF
$ make -j$(nproc)
$ sudo make install
Valhalla's Configuration & Map Data
OpenStreetMap is a 17-year-old collaborative project that has built a geographic database of the world. The database includes a large number of layers and metadata. An export for the entire world is over 64 GB as of this writing. Luckily there are per-country and per-continent extracts produced by Geofabrik GmbH and made freely available. The following downloads a 90 MB extract for Estonia.
$ cd ~
$ wget -c https://download.geofabrik.de/europe/estonia-latest.osm.pbf
Below I'll generate a configuration file for Valhalla. The resulting JSON file is 280 lines long.
$ mkdir -p ~/valhalla/scripts/{valhalla_tiles/traffic,conf}
$ valhalla_build_config \
    --mjolnir-tile-dir     ~/valhalla/scripts/valhalla_tiles \
    --mjolnir-tile-extract ~/valhalla/scripts/valhalla_tiles.tar \
    --mjolnir-timezone     ~/valhalla/scripts/valhalla_tiles/timezones.sqlite \
    --mjolnir-admin        ~/valhalla/scripts/valhalla_tiles/admins.sqlite \
    > ~/valhalla/scripts/conf/valhalla.json
I'll remove any configuration relating to live traffic. The isochrone will be based on the pace of a pedestrian. To put together a vehicle-based map would either require a commercial feed or a synthetic dataset. If this post is popular I might look into a vehicle-based follow-up.
$ sed -i '/traffic_extract/d' ~/valhalla/scripts/conf/valhalla.json
I'll build a tile set for Valhalla based on the OSM dataset I downloaded above. The tar file created below is 87 MB.
$ cd ~/valhalla/scripts/
$ valhalla_build_tiles \
    -c conf/valhalla.json \
    ~/estonia-latest.osm.pbf
$ find valhalla_tiles \
    | sort -n \
    | tar -cf "valhalla_tiles.tar" \
        --no-recursion \
        -T \
        -
I'll build a way_edges.txt file which will be used to figure out what routes one can take in Estonia.
$ cd ~/valhalla/scripts/valhalla_tiles
$ cp -R [0-9] traffic
$ find traffic/ -maxdepth 1 -type f -delete
$ valhalla_ways_to_edges --config ~/valhalla/scripts/conf/valhalla.json
The file generated above is 13 MB and contains 181K lines. Here is what the first few lines of the way_edges.txt file look like.
$ head way_edges.txt
1005067488,1,5945972466,0,6080190194
881013335,1,5375547122,0,5476210418
881013330,1,5006448370,0,5274883826
881013329,0,4972893938,1,5073557234
881013328,1,4872230642,0,5040002802
330005805,1,4637349618,0,4704458482
330005810,1,4234696434,0,4536686322
330005806,0,4167587570,1,4201142002,0,4335359730,1,4436023026
290240821,0,3563607794,1,3697825522,0,5979526898,1,6013081330
290145750,0,2791855858,1,2993182450
Finding a Route
I'll test the installation by generating a route between two locations in Estonia. I'll use OpenStreetMap's search engine to fetch the latitude and longitude for an address in Tallinn's Old Town.
$ curl --silent \
       --get \
       --data-urlencode "format=json" \
       --data-urlencode "limit=1" \
       --data-urlencode "q=Pikk 1, Tallinn" \
       https://nominatim.openstreetmap.org/search \
    | jq --slurp \
        '.[0][0] | "\(.lat) \(.lon)"'
"59.4377697 24.7432874"
I'll then fetch the latitude and longitude for an address in Pärnu.
$ curl --silent \
       --get \
       --data-urlencode "format=json" \
       --data-urlencode "limit=1" \
       --data-urlencode "q=Keskväljak 1, Pärnu" \
       https://nominatim.openstreetmap.org/search \
    | jq --slurp \
        '.[0][0] | "\(.lat) \(.lon)"'
"58.385300650000005 24.49652459579506"
I'll launch the Valhalla Web API server and ask it to produce a route between the above two locations.
$ valhalla_service ~/valhalla/scripts/conf/valhalla.json 2 &
$ curl --silent http://127.0.0.1:8002/route \
    --data '{"locations": [
                {"lat": 59.4377, "lon": 24.7432},
                {"lat": 58.3853, "lon": 24.4965}],
             "costing": "auto"}' \
    > ~/route.json
The resulting JSON file is 12 KB in size and 359-lines long when formatted with jq. Below I'll ensure a route was successfully found.
$ jq '.trip.status_message' \
    ~/route.json
"Found route between points"
Below I'll print out each manoeuvre of Valhalla's suggested route.
$ jq '.trip.legs[0].maneuvers[].instruction' \
    ~/route.json
"Drive east on Pikk."
"Bear right onto Voorimehe."
"Turn right onto Raekoja plats."
"Bear right onto Raekoja."
"Bear right onto Vanaturu kael."
"Turn right onto Vana turg."
"Turn left onto Suur-Karja."
"Turn right onto Pärnu mnt/4."
"Bear left to stay on Pärnu mnt/4."
"Keep left to stay on Pärnu mnt/4."
"Keep left to take 4/E 67."
"Keep right to stay on 4/E 67."
"Enter Tallinn — Pärnu — Ikla and take the 2nd exit onto 4/E 67/Tallinna mnt."
"Exit the roundabout onto 4/E 67/Tallinna mnt. Continue on Tallinna mnt."
"Bear right onto Akadeemia."
"Your destination is on the left."
Generating an Isochrone
I'll run a Python script that will generate the CLI calls needed to build five isochrones. The isochrones will represent how far one can travel in 10-minute increments. These five files will be blended together in QGIS to produce a single isochrone with a five-colour gradient.
$ cd ~
$ python3
import json


colour_minute = (
    ('e5cccf', 10),
    ('f7c4b1', 20),
    ('ed8d75', 30),
    ('ef684b', 40),
    ('e93a27', 50),
)

lat, lon = 59.4377, 24.7432

cmd = "valhalla_run_isochrone " \
      "--json '%s' " \
      "--config ~/valhalla/scripts/conf/valhalla.json " \
      "--file %02d.geojson"

cmds = []

for colour, minute in colour_minute:
    params = {
        "locations": [{"lat": lat,"lon": lon}],
        "costing": "pedestrian",
        "contours": [{"time": minute, "color": colour}]}
    cmds.append(cmd % (json.dumps(params), minute))

open('run.sh', 'w').write('\n'.join(cmds))
$ bash -x run.sh
The above produced ~17 KB of GeoJSON data.
$ find *.geojson
10.geojson
20.geojson
30.geojson
40.geojson
50.geojson
Rendering the Isochrone Map
I'll launch QGIS which is a desktop application. It's cross-platform and should run on macOS, Ubuntu Desktop and Windows without issue. Version 3.26 is the one used in this post.
I'll create a new document and then drag all 5 GeoJSON files onto it.
Under the Plugin's Menu click "Manage and Install Plugins". Install both "Tile+" and "Qgis2threejs".
Then, click "Tile+" under the Plugins Menu, select "Cartodb Dark" and hit the plus sign next to it. You should see a dark basemap appear below the isochrone layers. If the basemap obstructs the isochrones, move the "Cartodb Dark" layer in the bottom-left Layer's tab to the bottom of the list of layers.
Right-click the 10-minute isochrone layer and select "properties" from the drop-down menu. Click "Simple Line" under the Line item at the top of the dialog. Change the "Symbol layer type" to "Geometry Generator". Change the geometry type to "Polygon / MultiPolygon". Click "Fill" at the top of the dialog under the "Geometry Generator" node. Adjust the transparency to 25%. Select a gradient from the options below and hit "Apply" at the bottom of the dialog.
Repeat the above for the other four isochrone layers picking a different colour for each layer.
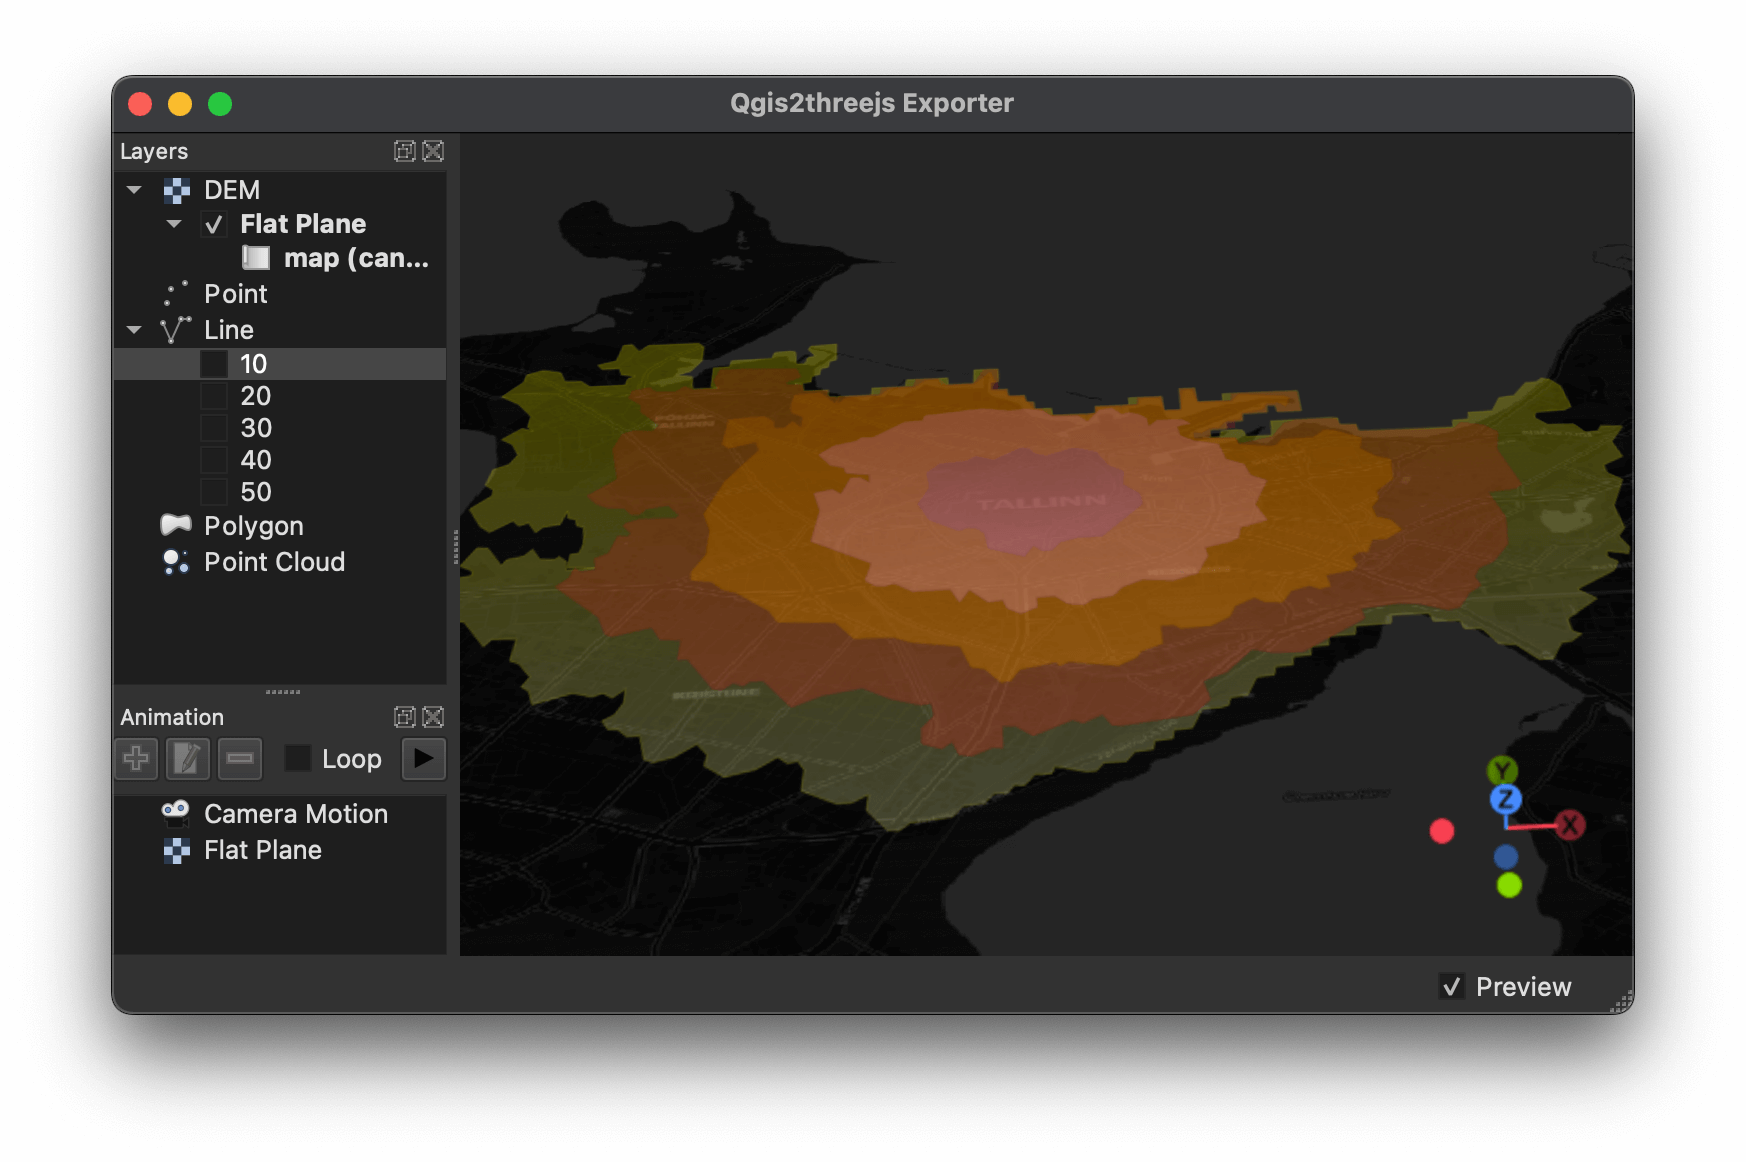
Then, under the Web Menu click "Qgis2threejs Exporter" under the "Qgis2threejs" section. Click the tickbox next to "Flat Plane" and you should be able to explore the isochrone map in 3D.